


CamRanger 2 Launcher: Send images from multiple cameras to a single computer
This is an electronic, searchable version of the CamRanger 2 Launcher User Manual for macOS and Windows.
Overview
Multiple CamRanger 2’s can each communicate with and send images to a single computer.
In summary, this first requires each CamRanger 2 to be joined (bridged) into an existing WiFi network. The CamRanger2 Launcher application can then be used to identify available CamRanger 2s and their associated IP address. A separate CamRanger 2 application is then started for each selected CamRanger 2 found by the Launcher application.
Setup
The CamRanger 2 Launcher application “launches” a separate copy of the normal
CamRanger application for each CamRanger 2. Download and copy the CamRanger 2
application to your computer before proceeding. The CamRanger 2 application can be
downloaded from https://camranger.com/downloads/.
Each CamRanger 2 must be bridged into the same existing WiFi network. This WiFi network could be created with a small, portable router for example, if one is not already available. This is required so that a single computer can communicate with multiple CamRanger 2s.
Bridging is done with the WebGUI. Perform the following steps for each CamRanger 2.
- Turn on the CamRanger 2 and wait for it to fully initialize.
- Connect the computer to the CamRanger 2 network: WiFi or Ethernet (preferred).
- Open a web browser and navigate to http://192.168.82.1, assuming the CamRanger 2 IP
address was not changed. - Enter the default password of admin and click “Login”.
- Select the WiFi tab in the web browser.
- For the desired WiFi band (2.4 GHz or 5 GHz), click “Configure” in the Client Network
section. - After a list of available network is displayed, select the desired network and follow the
prompts to enter the WiFi password. - The CamRanger 2 will restart its networking if the computer is connected to CamRanger
2 WiFi network. This will cause the WebGUI to disconnect requiring logging back in. - Ensure that an IP address is listed in the Client Network section to confirm that the
bridging was successful.
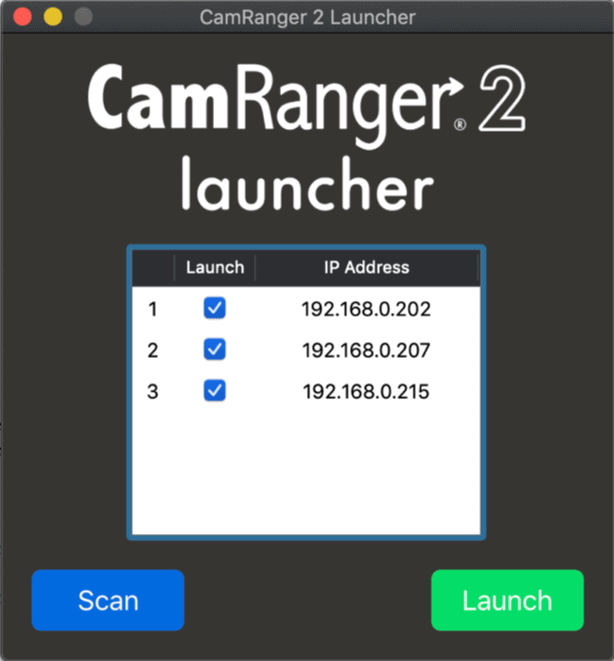
Using the CamRanger 2 Launch App
• Scan
Click the “Scan” button and the application will scan for CamRanger 2 units. Any units that are found will then be displayed in the table with their IP address.
• Launch
Click the “Launch” button and a separate CamRanger 2 application will be started for each
CamRanger 2 listing that has a check mark in the Launch column.
• CamRanger 2 app
Each CamRanger 2 app started by the launcher will have the CamRanger 2’s IP address listed in the title bar of the application window.
Manually “Launching”
The CamRanger 2 application can also be manually stared by providing the CamRanger 2 IP address by issuing the following command from the command line, where the actual IP
should replace ###.###.###.###:
macOS:
open -n -b com.camranger.CamRanger2 –args -ipAddress ###.###.###.###
*note that there are two dashes before args
Windows:
<path>/CamRanger 2.exe ###.###.###.###