


The user manual describes the basic functionality and usage of the CamRanger mini with Android devices.
CamRanger mini Hardware
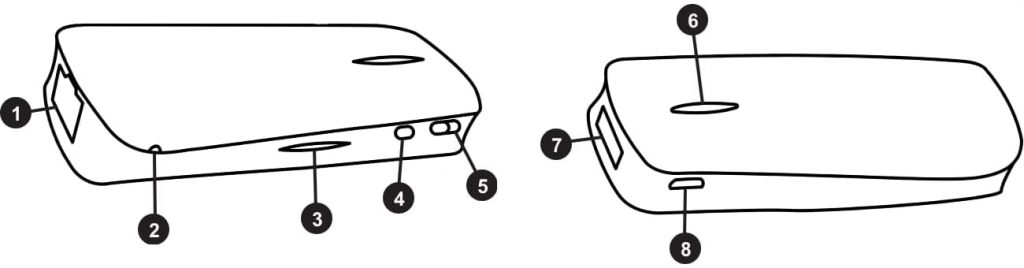
- Ethernet Port
- Reset Button – Press and hold to reset device to factory settings.
- Battery LEDs – 4 LEDs that show approximate battery life when Battery Button (4) is pressed.
- Battery Button – Press to show approximate battery life on Battery Indicator LEDs (3).
- Power Switch – Push all the way to the right to turn on and all the way to the left to turn off.
- Power/WiFi LEDs – Red LED shows power is on. Blue LED shows WiFi is on. The blue LED will blink during data transmission.
- USB Port – Connect the camera here.
- Charging Port – Charge with a USB micro cable.
The CamRanger Mini is not water resistant and should not get wet. The CamRanger Mini should not be allowed to hang from the camera by the USB cable. The USB cable connections should not be stressed. Besides the included pouch, attachment methods could include attaching the CamRanger Mini to an L-bracket or hot shoe attachments.
Setup
Charge CamRanger mini
Connect a USB micro cable to the CamRanger Mini charging port to charge. The device can be charged from a powered USB port or any standard 5V/1A USB AC adapter.
A blue LED next to the charging port will turn on while charging and turn off when the battery is fully charged. Fully charging the battery should take about 2-3 hours.
Download the CamRanger mini app The CamRanger Mini App is downloaded from the Google Play Store on your Android device. The easiest way to find it is to search “CamRanger Mini” within the Play Store app. The CamRanger mini app requires Android OS 5.0 (Lollipop)+.
Connect the camera to the CamRanger mini
Connect the camera to the CamRanger Mini using the appropriate type of USB cable. An angled USB mini cable is provided, which works for most cameras. However, some cameras use different cable types. The camera came with the correct cable, or another cable can be purchased.
The CamRanger Mini works with most Canon and Nikon DSLRs. Refer to this chart to see full information on supported cameras.
Connect to the CamRanger mini WiFi network
Turn on the CamRanger Mini and wait about 30-45 seconds for the device to initialize. When it is ready the blue WiFi LED will turn on.

Go to the Settings on the iPad/iPhone and select the WiFi section. Select and join the WiFi network “CamRanger-___” where the last three characters are the last three characters in the CamRanger mini serial code. The WiFi password is the CamRanger mini serial code in all CAPS.
Launch app
Ensure the camera is turned on and awake and launch the CamRanger mini app.
CamRanger mini App
Note: the CamRanger Mini app supports most Android devices running Android OS 5.0 (Lollipop)+. The layout of the app will vary slightly based on the device and orientation. However, only a single device and orientation will be displayed here.
Connection Screen
The connection screen appears after launching the application. The current WiFi network is displayed below the Connect button. The iOS device must be connected to the CamRanger WiFi network, so the network must be listed as the CamRanger-XXX.
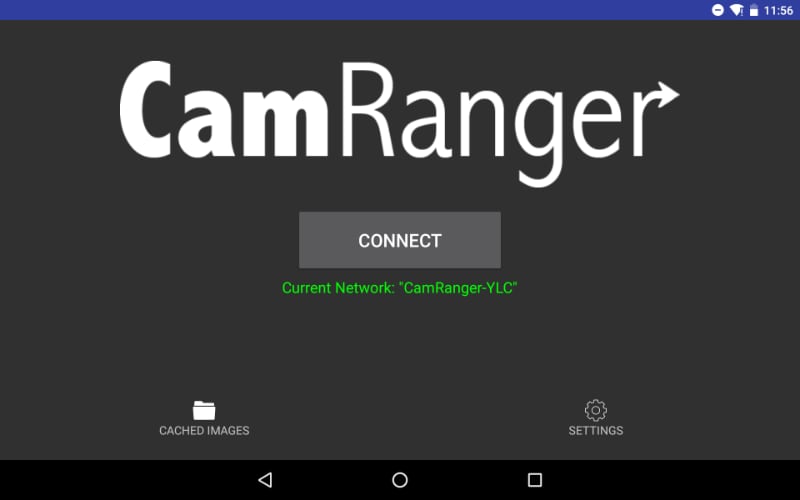
At the bottom of the screen are two buttons: Cached Images and Settings.
The Settings button will bring up the Settings screen (see the Settings section for more details). Note that a connection has not been made with the CamRanger at this point so some settings will not be available.
The Cached Images button will show the user thumbnails for all images that are currently saved in the temporary cache. The thumbnails can be double tapped to view the full resolution image. Viewing cached images should not be relied upon for viewing old images. However, it can be useful for quickly viewing recent images without being connected to the CamRanger and camera. It should be noted that if an image was not viewed previously then it will not be available in the cache.
After ensuring the camera is on, awake, and connected to the CamRanger with a USB cable, press “Connect” to connect to the CamRanger and begin a session. Please see the troubleshooting appendix if there are difficulties connecting.
Main Screen
After successfully connecting in the app, the main camera control screen will be displayed.
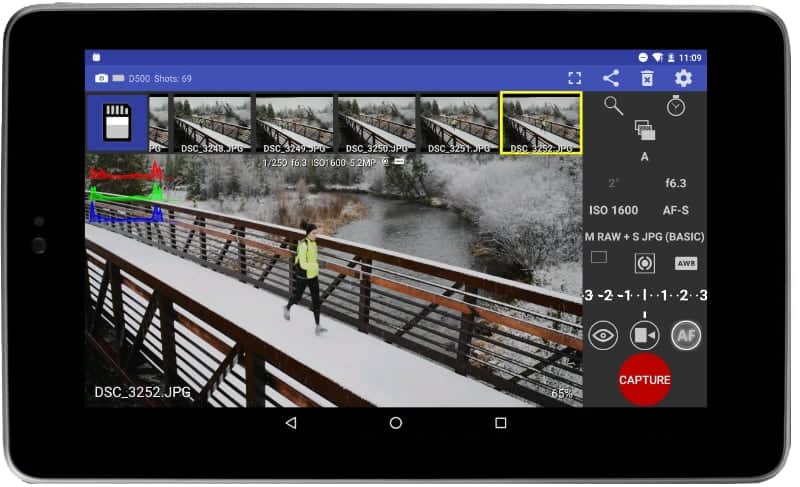
Status Bar
The status bar shows the camera’s battery life, camera name, and number of shots available on the camera’s removable media using the current settings. Note that not all cameras will provide the number of shots remaining.

The gear button the right will open the app settings. The settings are covered in depth in Settings section. The rectangular button will toggle between full screen. The share and delete buttons will only be visible if an image is being viewed. The share button will open a dialog with sharing options based on the Android device and the apps installed. The delete button will prompt the user to confirm that the selected image should be deleted from the camera’s memory card.
Recent Thumbnails

As images are captured, the thumbnails are automatically displayed along the top of the screen. RAW images will have a small red R icon at the top right. Video files will have a small blue video icon. JPG images will have no icon. If an image is captured in both RAW and JPG format, only the JPG thumbnail will be displayed.
Selecting a thumbnail will download the image to be displayed at full resolution. Selecting a RAW file will the download and display the JPG version embedded in the RAW. The resolution is the same, but it is compressed compared to the RAW. Video files cannot be downloaded.
Main Image View
The main image view displays both captured images and the live view stream.
Captured Image
The picture to the right shows a captured image with a number of overlays. These and other overlays can be toggled on or off from within the the settings. Images first display at a “fit to window” size. The image’s scale percentage is shown at the top right. Images may be zoomed in and out with a two finger pinch or by double tapping. The maximum zoom is 200%.
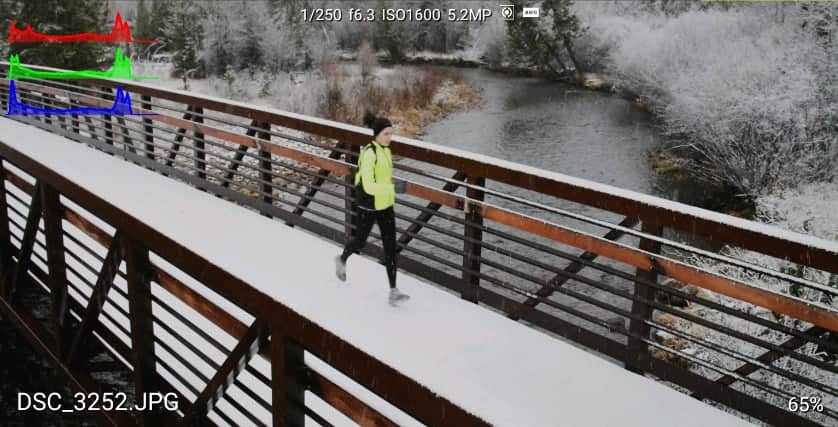
Images are oriented as the camera orients them. Typically the camera will have the option to configure the orientation of portrait images.
Live View Stream
When live view is on, the image in the main image view is automatically updated as new live view frames are received. The frame rate can vary greatly based on a number of parameters such as the signal strength and camera model. However, assuming a good connection, 10-15 fps would be typical.
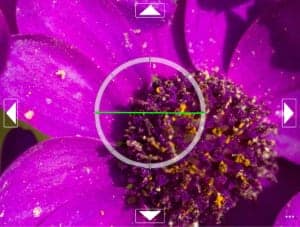
During live view the image may be single tapped to focus on that point, also known as “touch focus”. For cameras that support it, the focus box that is displayed will temporarily turn green if focus is acquired and turn red if focusing failed. Note that the CamRanger does not actually do any focusing, but simply tells the camera to try to focus at the selected area.
Double tapping on the image during live view will zoom in at that point, and then alternatively zoom back out. When zoomed in, arrow buttons will appear at the edges enabling small adjustments to the zoom positioning.
A variety of overlays are available in live view and are turned on or off from within the settings. Note that overlays such as histogram or focus peaking can reduce the live view frame rate.
Camera Properties
The camera properties will look slightly different depending on the device, orientation, and camera model.
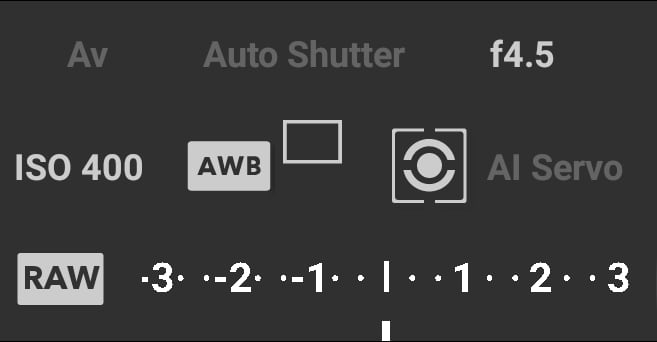
Auto exposure mode, shutter speed, ISO, white balance, focus mode, image format, drive/capture mode, and metering are displayed as shown. The exposure meter has a different meanings. It shows exposure bracketing and then either exposure compensation or exposure metering depending on the context. If the property can be changed, then it will be white. Disabled properties are grey. The values displayed are the values that are currently set on the camera.

The shutter speed, aperture and ISO are set with a slider that can be scrolled left and right. The value is set automatically after the slider has paused for a moment.

Other camera properties are set by selecting the value from a list of options.
Camera Actions
The red capture button initiates the camera trigger. The exact camera behavior is dependent on the camera and camera properties, most importantly the capture mode. The continuous capture mode operates differently for Nikon and Canon. For Canon, the capture button operates like the camera’s trigger, shots are taken as long as the capture button is pressed. Nikon is different in that if a continuous shooting mode is selected, a burst number must also be set. With each single capture press that number of shots will then be taken.
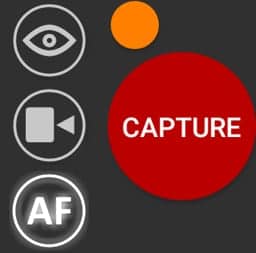
For Canon cameras, a yellow button will appear at the top left of the Capture button. This button is the equivalent of performing a “half-press” of the camera’s shutter button. This is useful for getting auto focus and determining the camera’s exposure metering. If the camera’s exposure mode is set to manual, the exposure meter will briefly show the exposure level. If set to an automated exposure mode, the exposure parameters calculated by the camera will be shown for a few seconds. For example, if in aperture priority, the shutter speed calculated by the camera will be shown briefly.
The auto / manual focus toggle button shows if the camera will attempt to focus as part of capture. Depending on the camera and configuration the user may or may not be able to change this.
The live view button toggles live view on and off. Live view must be controlled from the CamRanger and not from the camera.
The movie button toggles movie mode on and off. When movie mode is on, the Capture button changes to “Record” and pressing this button will start and stop movie recording.
HDR/Advanced Bracketing Tab
The HDR tab is accessed by pressing the HDR button shown highlighted in blue below. The HDR bracketing works by actually adjusting the camera’s exposure parameters between shots. The only limitations to the bracketing is the camera’s possible exposure parameters.
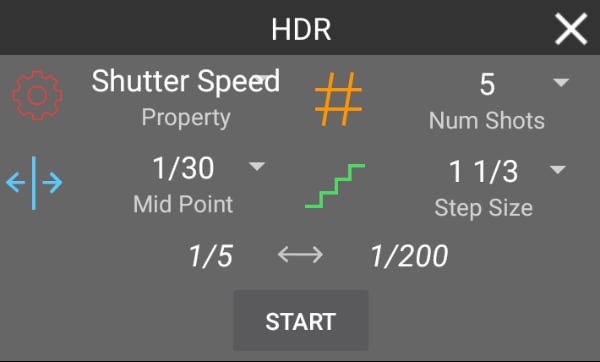
The property field specifies the camera property to be changed. The three options are Shutter Speed, Aperture, and ISO. The Mid-Point indicates the middle exposure of the sequence. The step size sets the number of steps to adjust the exposure between each shot. The number of shots specifies the number of shots in the sequence. The maximum number of shots is dynamically calculated based on the mid-point and the possible camera values.
The minimum and maximum exposure values for the sequence will be displayed above the Start button. Press the Start button to begin the sequence.
Because the CamRanger is actually changing the camera’s exposure parameters, the camera must be set to Manual exposure mode to perform HDR bracketing.
HDR sequences can also be performed when the camera is set to bulb mode. The settings are similar, except that the property is shutter speed/bulb duration and the mid-point is set in seconds. The minimum bulb duration is 100 ms. The Advanced Bracketing tab will automatically change to bulb settings when the camera is set to bulb mode.
Timer Tab
The Timer tab is accessed by pressing the stopwatch button and is used to configure the CamRanger as an intervalometer and specify exposure times when the camera is bulb mode.
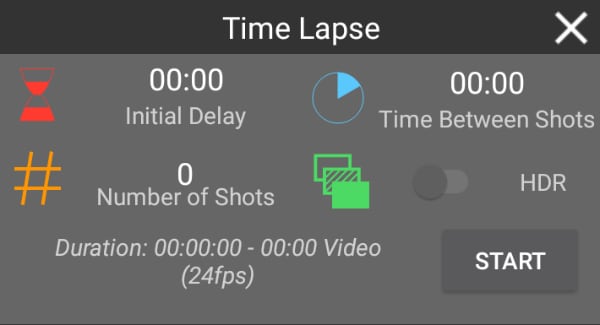
The initial delay is the amount of time to delay before the sequence is started. This can be useful for making a custom timer mode with a set delay. The number of shots to take must be entered as well as the time between shots. Note that depending on the camera, the time between shots may be longer than entered if the time is less than a few seconds.
The estimated duration for the time lapse to complete is automatically calculated and displayed, as well as the length of a 24 fps video if one was created from the resulting captures.
If the camera is in manual mode, the HDR switch may be toggled on. Each capture will then be an HDR sequence of captures. The HDR parameters are those that are set in the HDR tab.
Press “Start” to begin the sequence. After started, the iOS device does not need to remain connected to the CamRanger. So there is no need to remain close by during a long time lapse sequence.
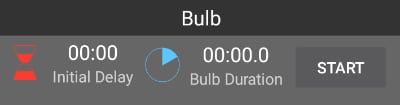
When the camera is in bulb mode, the timer tab can also be used to perform bulb shots with a specified duration. The Start button in the Bulb section will only take a single shot. However, time-lapse can be combined with bulb mode to perform a time-lapse with each bulb duration set by the shot duration.
Focus Tab
The Focus tab is accessed by pressing the magnifying glass button. Live view must be turned on to use the focus tab.
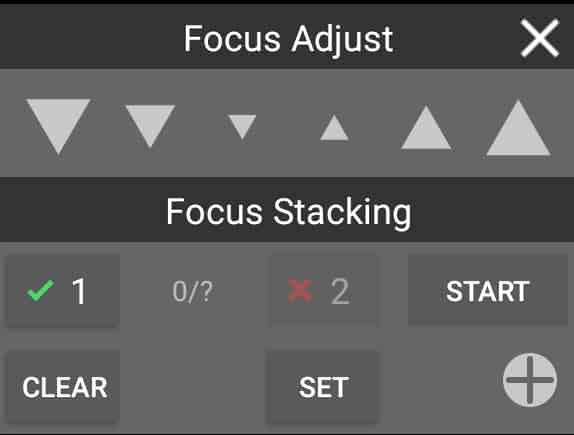
Focus Adjustments
The Focus Adjust section of the tab is for performing incremental adjustments to the focus. The arrow buttons will perform a large, medium, or small focus adjustment depending on the button selected. The arrows pointing down move the focus in closer while the arrows pointing up move the focus further away.
Focus Stacking
A new focus stacking method is available which automates more of the process. Changing to the previous focus stacking method is still possible by turning on “Classic Focus Stacking” in the settings. The new focus stacking method requires to user to specify the nearest and furthest focus points and then the CamRanger automates the step size and number of shots based on the camera, lens, and aperture. Because the aperture affects the depth of field, this focus stacking method can only be used when the camera is in manual or aperture priority exposure modes.
Point 1 is the nearest focus point and point 2 is the furthest away. The points are set by pressing the respective “Set” button when the focus is at the desired point. To set the first focus point any focus adjustment method can be used. However, after a point has been set only incremental focus adjustments can be used. Touch focus or manual lens cannot be used as there is then no way to track the focus changes that have been made. If one of these methods is used to change focus then any focus points that were set may be automatically cleared.
Once the two focus points are set, pressing the bullseye button will move the focus to that position. It will not be able to achieve a cinematic quality follow focus, but can be useful to return the lens to a particular focus point. Pressing clear with clear that focus point so it can be reset.
After the focus points are set, the Start button will enable and pressing it will start the focus stacking process.
For Canon cameras, the CamRanger can only know the lens focal length by downloading an image. If an image has not been downloaded in that session yet, the focus stacking section will be disabled and instead a button will be shown to take a configuration shot. Pressing the button will result in the camera capturing an image, downloading the image to determine the lens focal length and then immediately deleting the image.
Advanced Focus Stacking
Pressing the plus button will reveal the advanced focus stacking options and provide additional feedback.
Card Contents
Pressing the SD Card at the top left will open a new window that displays all the thumbnails for the images on the camera’s memory card.

To view an individual image, double tap on the thumbnail. Multiple images can be selected by tapping on the thumbnails. The images can then be deleted or shared with the Delete and Share buttons on the bottom right.
Settings
The settings menu is accessed from the gear button on the top right of the main screen or the lower right of the connection screen. The image shows the top level categories.
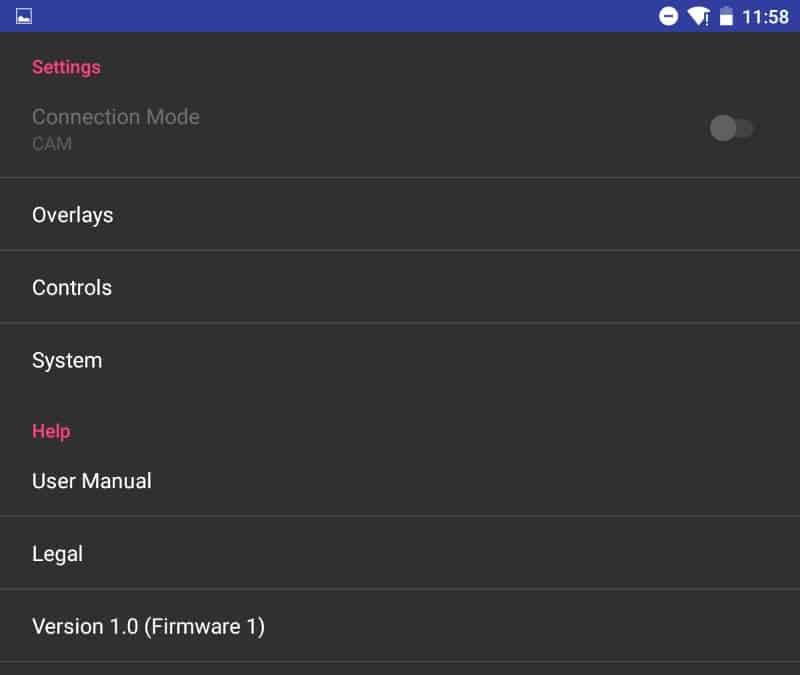
The Camera connection mode is a Nikon only setting and will not be displayed for Canon cameras. When set to PC, the camera is physically locked but the CamRanger can control more camera settings. In Camera mode shooting from the camera is possible, but changing certain settings with the CamRanger is not.
Image and Live View Overlays
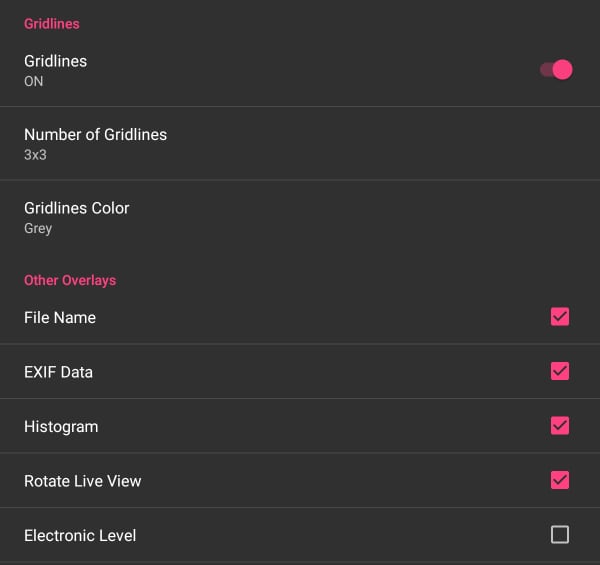
- Show Gridlines – overlays gridlines over both live view and captured images
- Grid Layout – the number of gridlines horizontally and vertically
- Gridlines Color – the color of the gridlines
- File Name – shows the captured image file name at the bottom left of the image
- Exif Data – displays basic meta data for captured images at the top of the image
- Histogram – shows an RGB histogram at the top left for both live view and captured images
- Rotate Live View – for select cameras the live view will automatically rotate when the camera is in portrait orientation
- Electronic Level – an electronic level is shown over live view for select cameras
- Focus Peaking – a red outline is drawn on in-focus edges (this is only an approximation of relative focus)
Note that the histogram and focus peaking overlay will reduce the live view frame rate or time for a captured image to display.
Controls & Workflows
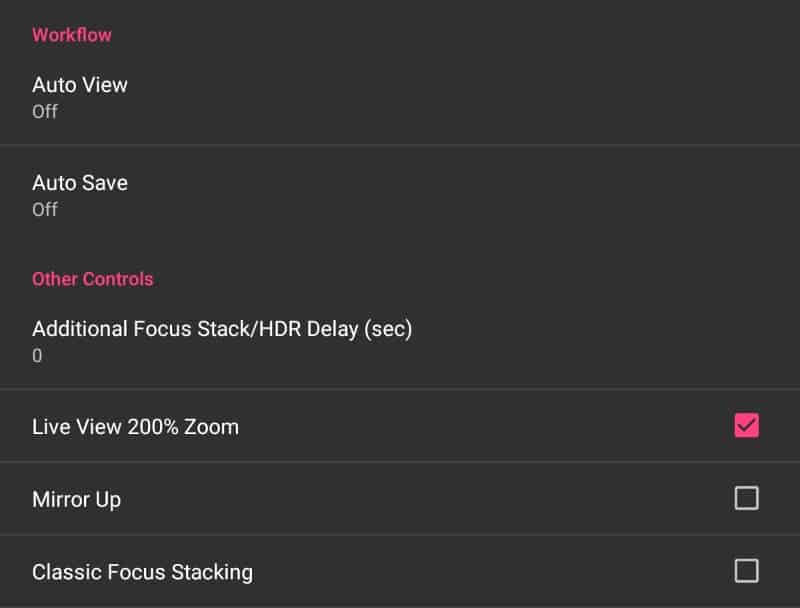
- Auto View Images – Three possible settings for automatically viewing images
- OFF – Captured images are not automatically displayed and must be individually selected to be viewed.
- ON – Captured images are automatically displayed as they are taken
- Camera – Images are not automatically displayed, but can be displayed as controlled by the photographer at the camera. To display an image it must be modified on the camera. this can be done a few ways, but theses methods may work well:
- Canon – Give the image a rating
- Nikon – “lock” the image
Other Controls
- HDR/Focus Stack Delay – add an additional delay between captures during focus stacking and HDR. This can be useful for things such as allowing flashes to recharge.
- 200% Live View Zoom – adds a 200% live view zoom level in addition to fit to window and 100%, if the camera supports 200% zoom
- Classic Focus Stacking – configure focus stacking with the original CamRanger method where the user selects the step size and number of shots
System
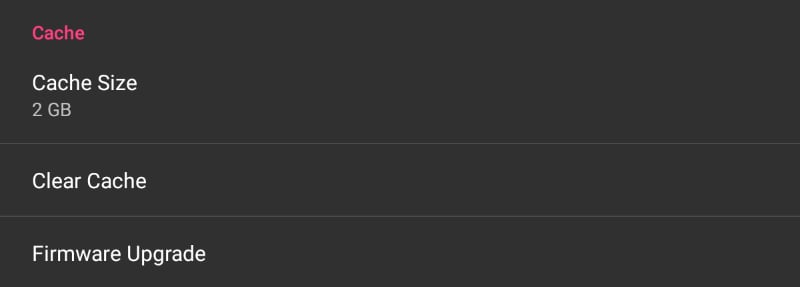
- Cache Size – sets the maximum storage size for recently viewed images
- Clear Cache – deletes all caches images
- Firmware Update – only visible when a firmware update is available
- User Manual – view this document
- Email Support – Opens a newly created email addressed to email CamRanger support
- Legal – Display terms, conditions, warning information, and licenses
- CamRanger Version – the first digits are the software/app version and the digits after the final period is the CamRanger firmware version
- Exit – closes the current session and returns to the connection screen
Tips & Troubleshooting
Connection
- Ensure the iPhone/iPad is connected to the CamRanger WiFi network
- If the CamRanger mini battery is very low, it may refuse to connect
- Any camera WiFi connectivity and/or built-in camera sharing must be disabled
- The CamRanger mini has the same limitations as any WiFi network and can be negatively impacted by environmental interference. Strong interference can result in a failure to join the CamRanger mini WiFi network.
Performance
- The closer the iPad/iPhone is to the CamRanger mini, the faster image transfer and live view will be.
- Environmental interference can reduce performance.
- Displaying high resolution images requires a lot of device RAM. If the amount of available RAM is low, then poor performance or crashes may occur. Restarting the iPad/iPhone will make more RAM available.
- Exact features are camera dependent. Unfortunately some cameras do not support all the features as other cameras.
Images
- Thumbnails are not displayed until after the image has finished saving to the camera’s memory card. This is usually relatively quick, but can take a little while depending on the memory card speed, image resolution, number of shots taken in succession, etc.
- Downloading images when shooting RAW images is very quick as the embedded JPG is transferred and displayed. If display speed is the most important factor, it will be faster to shoot RAW+small JPG. The small JPG has a lower resolution and can be displayed by the iPad/iPhone faster.
- If the camera has multiple memory cards, the image playback card should be set accordingly on the camera.
Important Information
This device complies with part 15 of the FCC Rules. Operation is subject to the following two conditions: (1) This device may not cause harmful interference, and (2) this device must accept any interference received, including interference that may cause undesired operation.
This equipment has been tested and found to comply with the limits for a Class B digital device, pursuant to part 15 of the FCC Rules. These limits are designed to provide reasonable protection against harmful interference in a residential installation. This equipment generates, uses and can radiate radio frequency energy and, if not installed and used in accordance with the instructions, may cause harmful interference to radio communications. However, there is no guarantee that interference will not occur in a particular installation. If this equipment does cause harmful interference to radio or television reception, which can be determined by turning the equipment off and on, the user is encouraged to try to correct the interference by one or more of the following measures:
Reorient or relocate the receiving antenna. Increase the separation between the equipment and receiver. Connect the equipment into an outlet on a circuit different from that to which the receiver is connected. Consult the dealer or an experienced radio/TV technician for help.
CamRanger is a registered trademark of CamRanger LLC. iOS, iPad, iPhone, and iPod Touch are registered trademarks of Apple Inc.
CamRanger is not for use for illegal purposes. CamRanger LLC is not responsible for damage or loss incurred to the camera, memory card, images, iOS device, or any third party equipment.
CamRanger LLC will not be responsible for any consequential or incidental damage resulting from the sale or use of any merchandise purchased from us. CamRanger LLC’s liability is limited to the monetary value of the merchandise.
There is no implied warranty of merchantability or fitness for a particular purpose on any item sold by CamRanger LLC.