


This user guide is written for the CamRanger mini or CamRanger 2 and iOS app. The setup and hardware is the same regardless of platform. However, the app images and details are specific to the iPhone and iPad. Details for other platforms can be found in those user manuals.
To use the PT hub and motorized tripod head a CamRanger and supported camera is required.
PT Hub Hardware
- USB A Connector – Connects to CamRanger
- Serial Connector – Connects to PT Hub
- USB B Connector – Connections to camera
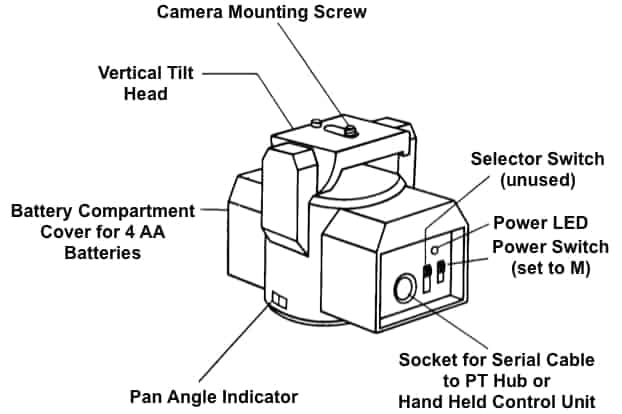
MP-360 Motorized Tripod Head Hardware
- Threaded Mounting Point – 1/4 20 threaded female opening for mounting to an existing tripod head (does NOT mount directly onto tripod legs)
- Battery Compartment – Open the battery compartment by sliding the cover downward and then lifting it outward. Insert 4 AA batteries oriented according to the markings in the battery compartment. The MP-360 may also be powered by an AC adapter.
- Power LED – Green when power is on (cannot be used to determine battery level)
- Power Switch – To turn on, set to “M”
- Camera Mounting Screw – 1/4 20 mounting screw
Specifications
- Power Source: 4 AA batteries or A/C adapter (neither included)
- Vertical Tilt: +/- 15 degrees
- Horizontal Pan: 360 degrees with unlimited rotation
- Maximum Camera Weight: 6 lb (2.7 kg)
- Size (LxHxW): 5.75 x 4.5 x 4 inches (145 x 115 x 103 mm)
- Weight: 1.75 lb (800 g)
Setup
Required Parts:
- CamRanger Mini
- PT Hub
- Motorized Tripod Head (MP-360, Bescor, or Hague)
- USB cable for camera connection
- Serial Cable (included with PT Hub)
- USB A to B cable (included with PT Hub)
- Camera
- Mobile Device (iOS/Android)
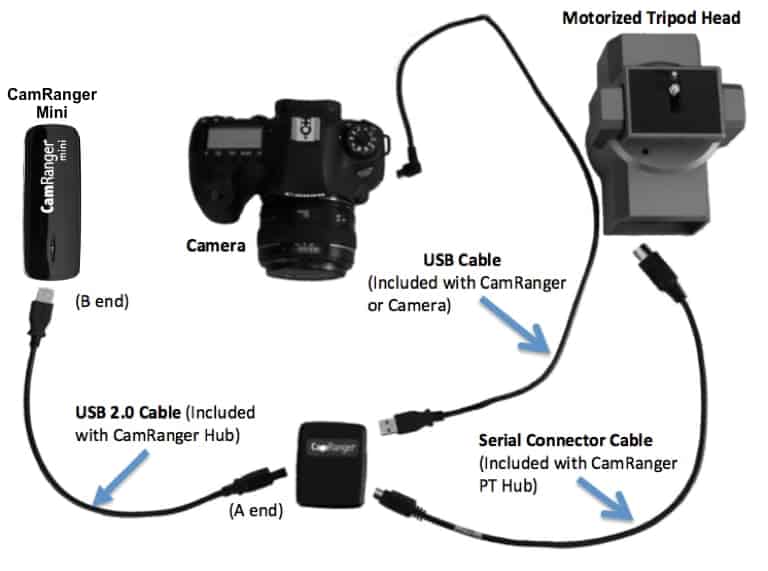
- Connect the CamRanger mini, PT Hub, tripod head, and camera as shown in the above diagram.
- Set the tripod head power switch to “M” to turn on the tripod head
- Setup and start the rest of the equipment as normally done
App Additions with the PT Hub and Tripod Head
** Please note the disclaimer at the top of this guide that not all CamRanger app will have the same features **
When the CamRanger app is started with the PT Hub and MP-360 connected, a tripod button will appear next to the other tab buttons.
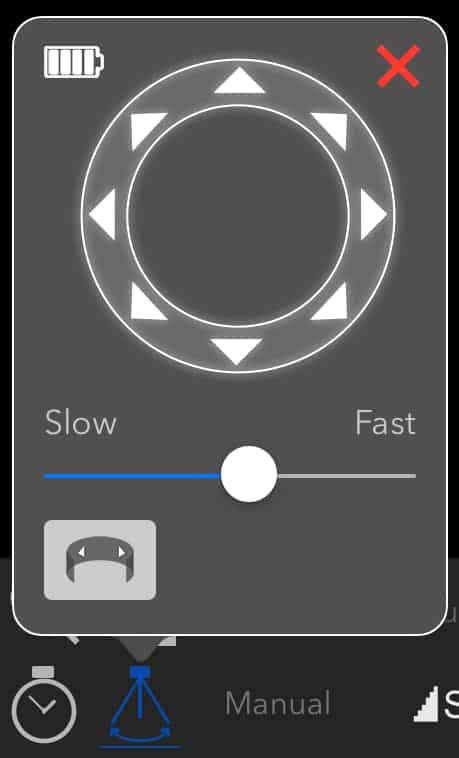
A directional pad is displayed on the tripod tab. Press and hold to move the tripod head in the desired direction. Double tapping will continue to move the tripod head in that direction until the directional pad is tapped again. The slider below the directional pad controls the pan/tilt speed of the tripod head. The approximate MP-360 battery capacity is shown at the top left.
The panorama button at the bottom left expands the tripod tab to display the controls for configuring an automated panorama.
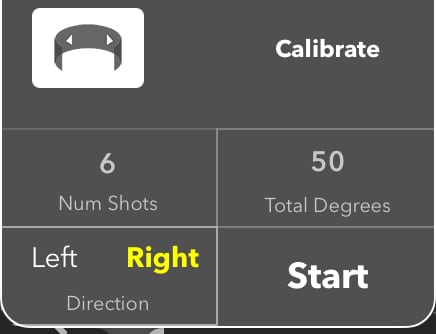
To perform a panorama, a calibration must first be performed. To calibrate, press the “Calibrate” button and follow the steps. The calibration is valid for four hours or until the session is restarted or the tripod head speed is adjusted.
After calibrating, the number of shots, total number of degrees, and panorama direction can be specified before pressing “Start” to begin the process.